
Wireless Sensors Network Kit: Difference between revisions
No edit summary |
|||
| (100 intermediate revisions by 3 users not shown) | |||
| Line 1: | Line 1: | ||
= Wireless Sensor | <div style="display: flex; gap: 40px; justify-content: space-between; flex-wrap: wrap;"> | ||
== | <!-- Left block --> | ||
<div style="flex: 1; min-width: 300px;"> | |||
<span style="font-size: 18px;">📌 <b>Why WSN is Important</b></span><br /> | |||
Wireless Sensor Networks (WSNs) are the nervous system of smart environments, they connect the physical world to the digital world by sensing, communicating, and reporting real-time data without human intervention. | |||
</div> | |||
<!-- Right block --> | |||
<div style="flex: 1; min-width: 300px;"> | |||
<span style="font-size: 18px;">🎓 <b>Why Cognifront's WSN Kit Matters</b></span><br /> | |||
Cognifront's WSN kit is the perfect starting point to explore the future of connected systems. It helps students and teachers to learn how real-world sensing, communication, and data processing work, all in one hands-on, scalable setup. | |||
</div> | |||
</div> | |||
== Overview == | |||
The WSN Kit is a modular wireless sensor network system designed for educational and experimental use. It includes: | The WSN Kit is a modular wireless sensor network system designed for educational and experimental use. It includes: | ||
* '''5 Sensor Nodes''' (based on NodeMCU ESP8266) | * '''5 Sensor Nodes''' (based on NodeMCU ESP8266) | ||
* '''2 Repeater Nodes''' (based on NodeMCU ESP8266) | * '''2 Repeater Nodes''' (based on NodeMCU ESP8266) | ||
* '''1 | * '''1 Centeral Server Node''' (based on Raspberry Pi) | ||
* ''' | * '''GUI Based Management Software''' for configuration, real-time network and data visualization, other utilities. | ||
Explore the key components of the '''Wireless Sensors Network (WSN) Kit''' through these images. This gallery gives you a closer look at what’s inside the kit and how each sensor node is designed for hands-on learning. | |||
=== Take a Look:=== | |||
{| style="width:80%; border-collapse:collapse; border:none; background:none;" | |||
|- | |||
| style="width:30%; text-align:center; padding:10px;" | [[File:Wsn-rpi.jpg|201px]]<br> <span style="font-size:16px; font-weight:bold;">Raspberry Pi Server</span> <br>It acts as the central hub for data collection. All sensor nodes send data to this server, which displays real-time graphs. | |||
| style="width:30%; text-align:center; padding:10px;" | [[File:Wsn-r-pi-2.png|325px ]] <br>inside view | |||
<br> | |||
|- | |||
| style="text-align:center; padding:10px;" | [[File:Gas-wsn.png|200px]]<br> <span style="font-size:16px; font-weight:bold;">Gas Sensor Node</span><br> Detects flammable or harmful gases and streams real-time values to ensure safety in monitored environments. | |||
| style="width:30%; text-align:center; padding:10px;" | [[File:Wsn-gas-2.png|250px ]] <br>inside view | |||
|- | |||
| style="text-align:center; padding:10px;" | [[File:Temp-node.png|200px]]<br> <span style="font-size:16px; font-weight:bold;">Temperature Sensor Node</span><br> Tracks ambient temperature changes — ideal for labs, weather stations, and smart buildings. | |||
| style="width:30%; text-align:center; padding:10px;" | [[File:Wsn-temp-2.png|250px ]] <br>inside view | |||
|- | |||
| style="text-align:center; padding:10px;" | [[File:hum-node.png|200px]]<br> <span style="font-size:16px; font-weight:bold;">Humidity Sensor Node</span><br> Monitors moisture levels in the environment — suitable for agriculture, greenhouses, and industrial monitoring. | |||
| style="width:30%; text-align:center; padding:10px;" | [[File:Wsn-hum-2.png|250px ]] <br>inside view | |||
|- | |||
| style="text-align:center; padding:10px;" | [[File:ldr-node.png|200px]]<br> <span style="font-size:16px; font-weight:bold;">LDR Sensor Node</span><br> Measures light intensity — great for automating lighting in smart homes and buildings. | |||
| style="width:30%; text-align:center; padding:10px;" | [[File:Wsn-ldr-2.png|250px ]] <br>inside view | |||
|- | |||
| style="text-align:center; padding:10px;" | [[File:Push-btn-node.png|200px]]<br> <span style="font-size:16px; font-weight:bold;">Push Button Node</span><br> Used for user input or triggering actions in IoT projects and experiments. | |||
| style="width:30%; text-align:center; padding:10px;" | [[File:wsn-btn-node.png|250px ]] <br>inside view | |||
|- | |||
| style="text-align:center; padding:10px;" | [[File:Wsn-repeater.png|200px]]<br> <span style="font-size:16px; font-weight:bold;">Repeater Node</span><br> Extends network range by relaying data — doesn’t sense but boosts coverage effectively. | |||
| style="width:30%; text-align:center; padding:10px;" | [[File:Wsn-rpn-2.png|250px ]] <br>inside view | |||
|} | |||
'''These images are part of the WSN Kit developed by Cognifront – a powerful tool for interactive, real-time IoT education.''' | |||
== | == System Architecture == | ||
The system follows a hierarchical network model: | The system follows a hierarchical network model: | ||
* '''Sensor Nodes''' transmit data to '''Repeater Nodes''' | * '''Sensor Nodes''' transmit data to '''Repeater Nodes''' | ||
* '''Repeater Nodes''' forward the data to the ''' | * '''Repeater Nodes''' forward the data to the '''Central Server''' | ||
* The '''Server Node''' | * The '''Server Node''' stores, processes, and visualizes the data with the Desktop GUI | ||
'''Important Notes:''' | '''Important Notes:''' | ||
* Sensor → Repeater (one-way) | * Sensor → Repeater (one-way) | ||
* Repeater → Server (one-way) | * Repeater → Server (one-way) | ||
* No | * No Direct Sensor ↔ Server communication | ||
* Each Sensor connects to only one Repeater | * Each Sensor connects to only one Repeater | ||
* Each Repeater connects to only one Repeater | * Each Repeater connects to only one Repeater or Server | ||
* If the distance between a Sensor Node and the Server Node exceeds the WiFi range of the NodeMCU module, one or more Repeaters must be placed between them to extend the communication range and ensure reliable data transmission. | |||
== | == Components == | ||
{| class="wikitable" style="width: 100%; text-align: left;" | {| class="wikitable" style="width: 100%; text-align: left;" | ||
| Line 44: | Line 94: | ||
| 1 | | 1 | ||
| Raspberry Pi | | Raspberry Pi | ||
| Collects | | Collects and stores data | ||
|- | |- | ||
| Desktop GUI | | Desktop GUI | ||
| 1 | | 1 | ||
| Cross-platform | | Cross-platform | ||
| | | Visualizes nodes, connections, and data status | ||
|} | |} | ||
== | == Sensor Types Used == | ||
Each sensor node in the WSN Kit is equipped with one or more of the following sensors: | Each sensor node in the WSN Kit is equipped with one or more of the following sensors: | ||
* ''' | * '''Humidity Sensor (HR202)''' – Detects ambient humidity levels. | ||
* ''' | * '''Waterproof Temperature Sensor (DS18B20)''' – Measures temperature in harsh or wet environments. | ||
* ''' | * '''Smoke Sensor (MQ2)''' – Detects smoke presence in the air. | ||
* '''LDR (Light Dependent Resistor)''' – Measures light intensity. | * '''LDR (Light Dependent Resistor)''' – Measures light intensity. | ||
* '''Push Button''' – Used as a manual trigger to activate a buzzer. | * '''Push Button''' – Used as a manual trigger to activate a buzzer. | ||
| Line 64: | Line 114: | ||
These sensors help demonstrate different real-world use cases such as environmental monitoring, fire detection, and user interaction. | These sensors help demonstrate different real-world use cases such as environmental monitoring, fire detection, and user interaction. | ||
== Connection Flow Diagram == | |||
<div style="flex: 1;"> | |||
[[File:Node-visualization-with-protocol.jpeg |frameless|500px|Desktop GUI showing network topology.]] | |||
</div> | |||
=== Default Configuration (Extended Range) === | |||
<pre> | |||
Sensor Node (S1) ---> Repeater Node (R1) | |||
Sensor Node (S2) ---> Repeater Node (R1) | |||
Sensor Node (S3) ---> Repeater Node (R2) | |||
Sensor Node (S4) ---> Repeater Node (R2) | |||
Sensor Node (S5) ---> Repeater Node (R2) | |||
Repeater Node (R1) --- Repeater Node (R2) # Daisy-chaining repeaters | |||
Repeater Node (R2) ---> Server (Raspberry Pi) | |||
</pre> | |||
== | === Alternative Configuration (Direct Server Links) === | ||
<pre> | <pre> | ||
Sensor Node (S1) ---> Repeater Node (R1) | Sensor Node (S1) ---> Repeater Node (R1) | ||
| Line 73: | Line 140: | ||
Sensor Node (S5) ---> Repeater Node (R2) | Sensor Node (S5) ---> Repeater Node (R2) | ||
Repeater Node (R1) ---> Server (Raspberry Pi) | Repeater Node (R1) ---> Server (Raspberry Pi) # Both repeaters connect directly | ||
Repeater Node (R2) ---> Server (Raspberry Pi) | Repeater Node (R2) ---> Server (Raspberry Pi) | ||
</pre> | </pre> | ||
== | '''Protocol Labels:''' | ||
* Sensor → Repeater: ESP-NOW | |||
* Repeater → Server: HTTP | |||
== Desktop GUI Features == | |||
The WSN Kit includes a cross-platform Desktop GUI that allows real-time visualization and monitoring of the network. | |||
=== Key Features === | |||
* Live network topology map | |||
* Real-time data stream from sensors | |||
* Node-to-repeater and repeater-to-server connection indicators | |||
* Node status (active/inactive) | |||
* Configurable update interval | |||
* WSN Conceptual mode | |||
<div style="display: flex; gap: 20px; justify-content: flex-start; align-items: flex-start; flex-wrap: wrap;"> | |||
<div style="flex: 1;"> | |||
[[File:wsn-editor.png|frameless|500px|Desktop GUI showing network topology.]] | |||
</div> | |||
<div style="flex: 1;"> | |||
[[File:wsn-conseptual-mode.png|frameless|500px|Desktop GUI showing conceptual mode.]] | |||
</div> | |||
</div> | |||
== Applications of the WSN Kit == | |||
The Wireless Sensor Network (WSN) Kit can be used in a variety of real-world scenarios, including but not limited to: | |||
* '''Environmental Monitoring''': Measuring temperature, humidity, smoke, and light levels in indoor or outdoor environments. | |||
* '''Fire Detection''': Using smoke sensors and temperature sensors to detect early signs of fire. | |||
* '''Home Automation''': Triggering alerts or devices (e.g., buzzers) based on sensor inputs like push buttons or environmental conditions. | |||
* '''Educational Purposes''': Teaching concepts of wireless communication, sensor integration, and network topology visualization. | |||
* '''Industrial Monitoring''': Collecting data from multiple sensors to monitor equipment health and safety conditions. | |||
* '''Security Systems''': Detecting unauthorized access or environmental anomalies with sensors and immediate alerts. | |||
==Academic and Research Projects== | |||
The '''Cognifront WSN Kit''' is designed to support a wide range of academic and research projects, making it an ideal platform for both classroom learning and real-world experimentation. Below are some highlights and suggestions for leveraging the kit in educational and research contexts: | |||
'''Research and Visualization Tools''' | |||
* The kit includes a cross-platform Desktop GUI for real-time data visualization and network topology mapping. | |||
* Sample dataset images and live network views help users understand system operation and data flow. | |||
'''Technical and Practical Insights''' | |||
* Details about sensor specifications, calibration procedures, and limitations are provided to help users assess system accuracy and reliability. | |||
* Powering options (e.g., 1A power adapters or power banks) support flexible deployments. | |||
* Security features like data encryption ensure safe data transfer from sensors to the server. | |||
==Hands-On Learning and Customization== | |||
* Students can configure the kit themselves, experiment with node placement, and adjust network parameters. | |||
* The database is exportable, enabling students to analyze data and generate reports for academic purposes. | |||
* The modular design allows for customization—users can add or remove sensors, adjust distances, and adapt the network for different scenarios. | |||
* Students are encouraged to set up and configure the kit independently, fostering deeper learning and hands-on experimentation. | |||
==Project Ideas for Students== | |||
* Environmental monitoring and analysis (e.g., tracking temperature, humidity, smoke, and light levels in various locations) | |||
* Smart agriculture: soil moisture and microclimate monitoring for crop optimization | |||
* Home or classroom automation: controlling devices based on sensor data | |||
* Fire and safety alert systems using real-time sensor feedback | |||
* Custom sensor integration and network expansion experiments | |||
* Data analysis and reporting: | |||
** Environmental monitoring, smart agriculture, fire detection, automation. Students can export sensor data for research, analysis, and then make reports accordingly. | |||
==Challenges and Workarounds== | |||
* The kit documentation addresses common challenges such as energy management, sensor placement, and troubleshooting connectivity. | |||
* Strategies like increasing sensor idle time and optimizing update intervals help extend network life and reliability. | |||
The Cognifront WSN Kit thus empowers students and researchers to explore, innovate, and solve real-world problems using wireless sensor networks in a hands-on, scalable, and customizable environment. | |||
== Live Dataset & Backend Visualization == | |||
Our WSN Kit not only collects real-time sensor data, but also stores it in a structured backend database. This enables users to monitor, analyze, and export sensor readings for further research or reporting. | |||
Below are sample screenshots from our backend (phpMyAdmin) showing: | |||
* The list of registered nodes repeaters and sensors | |||
** Repeater 1 | |||
** Repeater 2 | |||
** LDR sensor | |||
** Temperature sensor | |||
** Gas sensor | |||
** Push button/Trigger sensor | |||
** Humidity sensor | |||
* The live stream of sensor data as it is recorded in the database, including timestamps and sensor values. | |||
These visuals help students and researchers understand how sensor data is stored, managed, and can be accessed for further analysis or visualization. | |||
<gallery mode="packed" heights=300> | |||
File:wsn-node-table.jpeg|'''Node Registration Table'''<br />Inside view of the backend table displaying all registered sensor and repeater nodes, including MAC address, node type, and assignment. | |||
File:wsn-data-table.jpg|'''Live Sensor Data Table'''<br />Inside view of the data table showing real-time sensor readings, values, and timestamps as collected from the deployed nodes. | |||
</gallery> | |||
You can use this backend to: | |||
* Track which sensors are active and their current configuration. | |||
* Analyze historical data trends for each sensor type (temperature, humidity, gas, etc.). | |||
* Export the dataset for use in spreadsheets, reports, or further data visualization tools. | |||
''This transparent view of the backend empowers students to learn about data management, database structure, and the importance of reliable data storage in IoT projects.'' | |||
==Frequently Asked Questions== | |||
<div class="mw-collapsible mw-collapsed"> | |||
'''Why isn't sensor data visible on the GUI?''' | |||
<div class="mw-collapsible-content"> | |||
* Ensure all nodes have power (check LED indicators). | |||
* Verify WiFi connectivity between nodes and the server. | |||
* Confirm the Desktop GUI is running and set to "Live Mode". | |||
* Check if sensor-repeater-server connections follow the hierarchical architecture. | |||
</div> | |||
</div> | |||
<div class="mw-collapsible mw-collapsed"> | |||
'''How do I troubleshoot unstable connections?''' | |||
<div class="mw-collapsible-content"> | |||
* Reduce physical distance between nodes (ideal range: 10–30 meters). | |||
* Avoid placing nodes near microwave ovens or metal surfaces. | |||
* Restart the Server Node and Repeaters to reset the network. | |||
</div> | |||
</div> | |||
<div class="mw-collapsible mw-collapsed"> | |||
'''Are the sensors pre-calibrated?''' | |||
<div class="mw-collapsible-content"> | |||
* Yes, all sensors are factory-calibrated. For advanced projects: | |||
** Temperature: Recalibrate using ice-water (0°C) and boiling water (100°C). | |||
** Humidity: Use a calibrated hygrometer for reference. | |||
</div> | |||
</div> | |||
<div class="mw-collapsible mw-collapsed"> | |||
'''Can I power the nodes with batteries?''' | |||
<div class="mw-collapsible-content"> | |||
* Yes! Use 2xAA batteries (3.7V) for Sensor/Repeater Nodes. | |||
* For prolonged use, connect a 5V/1A power bank to the Server Node. | |||
</div> | |||
</div> | |||
<div class="mw-collapsible mw-collapsed"> | |||
'''Have you deployed this kit in real industries?''' | |||
<div class="mw-collapsible-content"> | |||
* '''Yes!''' Example: '''CEAT Tyres Manufacturing Plant''' | |||
* '''Problem''': Monitoring temperature and humidity in vulcanization chambers. | |||
* '''Solution''': Deployed '''21 sensors''' (temperature/humidity etc) and 42 total nodes were used. | |||
* '''Result''': 15% energy savings via optimized HVAC control. | |||
</div> | |||
</div> | |||
<div class="mw-collapsible mw-collapsed"> | |||
'''How many sensors can I add to the network?''' | |||
<div class="mw-collapsible-content"> | |||
* Theoretically '''unlimited'''! Practical limits depend on: | |||
** WiFi bandwidth (recommended: ≤50 nodes per server). | |||
** Power availability (use solar panels for large deployments). | |||
</div> | |||
</div> | |||
== | <div class="mw-collapsible mw-collapsed"> | ||
* | '''Is the data encrypted during transmission?''' | ||
* | <div class="mw-collapsible-content"> | ||
* Yes! HTTP protocol is used from the repeater to the server. | |||
* ESP-NOW protocol is used from the sensors to the repeaters. | |||
</div> | |||
</div> | |||
== | == Notes == | ||
* Make sure each sensor is uniquely addressed. | * Make sure each sensor is uniquely addressed. | ||
* Only one repeater should handle a sensor's data. | * Only one repeater should handle a sensor's data. | ||
Latest revision as of 03:11, 16 August 2025
📌 Why WSN is Important
Wireless Sensor Networks (WSNs) are the nervous system of smart environments, they connect the physical world to the digital world by sensing, communicating, and reporting real-time data without human intervention.
🎓 Why Cognifront's WSN Kit Matters
Cognifront's WSN kit is the perfect starting point to explore the future of connected systems. It helps students and teachers to learn how real-world sensing, communication, and data processing work, all in one hands-on, scalable setup.
Overview
The WSN Kit is a modular wireless sensor network system designed for educational and experimental use. It includes:
- 5 Sensor Nodes (based on NodeMCU ESP8266)
- 2 Repeater Nodes (based on NodeMCU ESP8266)
- 1 Centeral Server Node (based on Raspberry Pi)
- GUI Based Management Software for configuration, real-time network and data visualization, other utilities.
Explore the key components of the Wireless Sensors Network (WSN) Kit through these images. This gallery gives you a closer look at what’s inside the kit and how each sensor node is designed for hands-on learning.
Take a Look:
 Raspberry Pi Server It acts as the central hub for data collection. All sensor nodes send data to this server, which displays real-time graphs. |
 inside view
|
 Gas Sensor Node Detects flammable or harmful gases and streams real-time values to ensure safety in monitored environments. |
 inside view |
 Temperature Sensor Node Tracks ambient temperature changes — ideal for labs, weather stations, and smart buildings. |
 inside view |
 Humidity Sensor Node Monitors moisture levels in the environment — suitable for agriculture, greenhouses, and industrial monitoring. |
 inside view |
 LDR Sensor Node Measures light intensity — great for automating lighting in smart homes and buildings. |
 inside view |
 Push Button Node Used for user input or triggering actions in IoT projects and experiments. |
 inside view |
 Repeater Node Extends network range by relaying data — doesn’t sense but boosts coverage effectively. |
 inside view |
These images are part of the WSN Kit developed by Cognifront – a powerful tool for interactive, real-time IoT education.
System Architecture
The system follows a hierarchical network model:
- Sensor Nodes transmit data to Repeater Nodes
- Repeater Nodes forward the data to the Central Server
- The Server Node stores, processes, and visualizes the data with the Desktop GUI
Important Notes:
- Sensor → Repeater (one-way)
- Repeater → Server (one-way)
- No Direct Sensor ↔ Server communication
- Each Sensor connects to only one Repeater
- Each Repeater connects to only one Repeater or Server
- If the distance between a Sensor Node and the Server Node exceeds the WiFi range of the NodeMCU module, one or more Repeaters must be placed between them to extend the communication range and ensure reliable data transmission.
Components
| Component | Quantity | Platform | Description |
|---|---|---|---|
| Sensor Node | 5 | NodeMCU ESP8266 | Equipped with environmental sensors |
| Repeater Node | 2 | NodeMCU ESP8266 | Relays data to the Server |
| Server Node | 1 | Raspberry Pi | Collects and stores data |
| Desktop GUI | 1 | Cross-platform | Visualizes nodes, connections, and data status |
Sensor Types Used
Each sensor node in the WSN Kit is equipped with one or more of the following sensors:
- Humidity Sensor (HR202) – Detects ambient humidity levels.
- Waterproof Temperature Sensor (DS18B20) – Measures temperature in harsh or wet environments.
- Smoke Sensor (MQ2) – Detects smoke presence in the air.
- LDR (Light Dependent Resistor) – Measures light intensity.
- Push Button – Used as a manual trigger to activate a buzzer.
These sensors help demonstrate different real-world use cases such as environmental monitoring, fire detection, and user interaction.
Connection Flow Diagram

Default Configuration (Extended Range)
Sensor Node (S1) ---> Repeater Node (R1)
Sensor Node (S2) ---> Repeater Node (R1)
Sensor Node (S3) ---> Repeater Node (R2)
Sensor Node (S4) ---> Repeater Node (R2)
Sensor Node (S5) ---> Repeater Node (R2)

Repeater Node (R1) --- Repeater Node (R2)  # Daisy-chaining repeaters
Repeater Node (R2) ---> Server (Raspberry Pi)
Alternative Configuration (Direct Server Links)
Sensor Node (S1) ---> Repeater Node (R1)
Sensor Node (S2) ---> Repeater Node (R1)
Sensor Node (S3) ---> Repeater Node (R2)
Sensor Node (S4) ---> Repeater Node (R2)
Sensor Node (S5) ---> Repeater Node (R2)

Repeater Node (R1) ---> Server (Raspberry Pi)  # Both repeaters connect directly
Repeater Node (R2) ---> Server (Raspberry Pi)
Protocol Labels:
- Sensor → Repeater: ESP-NOW
- Repeater → Server: HTTP
Desktop GUI Features
The WSN Kit includes a cross-platform Desktop GUI that allows real-time visualization and monitoring of the network.
Key Features
- Live network topology map
- Real-time data stream from sensors
- Node-to-repeater and repeater-to-server connection indicators
- Node status (active/inactive)
- Configurable update interval
- WSN Conceptual mode


Applications of the WSN Kit
The Wireless Sensor Network (WSN) Kit can be used in a variety of real-world scenarios, including but not limited to:
- Environmental Monitoring: Measuring temperature, humidity, smoke, and light levels in indoor or outdoor environments.
- Fire Detection: Using smoke sensors and temperature sensors to detect early signs of fire.
- Home Automation: Triggering alerts or devices (e.g., buzzers) based on sensor inputs like push buttons or environmental conditions.
- Educational Purposes: Teaching concepts of wireless communication, sensor integration, and network topology visualization.
- Industrial Monitoring: Collecting data from multiple sensors to monitor equipment health and safety conditions.
- Security Systems: Detecting unauthorized access or environmental anomalies with sensors and immediate alerts.
Academic and Research Projects
The Cognifront WSN Kit is designed to support a wide range of academic and research projects, making it an ideal platform for both classroom learning and real-world experimentation. Below are some highlights and suggestions for leveraging the kit in educational and research contexts:
Research and Visualization Tools
- The kit includes a cross-platform Desktop GUI for real-time data visualization and network topology mapping.
- Sample dataset images and live network views help users understand system operation and data flow.
Technical and Practical Insights
- Details about sensor specifications, calibration procedures, and limitations are provided to help users assess system accuracy and reliability.
- Powering options (e.g., 1A power adapters or power banks) support flexible deployments.
- Security features like data encryption ensure safe data transfer from sensors to the server.
Hands-On Learning and Customization
- Students can configure the kit themselves, experiment with node placement, and adjust network parameters.
- The database is exportable, enabling students to analyze data and generate reports for academic purposes.
- The modular design allows for customization—users can add or remove sensors, adjust distances, and adapt the network for different scenarios.
- Students are encouraged to set up and configure the kit independently, fostering deeper learning and hands-on experimentation.
Project Ideas for Students
- Environmental monitoring and analysis (e.g., tracking temperature, humidity, smoke, and light levels in various locations)
- Smart agriculture: soil moisture and microclimate monitoring for crop optimization
- Home or classroom automation: controlling devices based on sensor data
- Fire and safety alert systems using real-time sensor feedback
- Custom sensor integration and network expansion experiments
- Data analysis and reporting:
- Environmental monitoring, smart agriculture, fire detection, automation. Students can export sensor data for research, analysis, and then make reports accordingly.
Challenges and Workarounds
- The kit documentation addresses common challenges such as energy management, sensor placement, and troubleshooting connectivity.
- Strategies like increasing sensor idle time and optimizing update intervals help extend network life and reliability.
The Cognifront WSN Kit thus empowers students and researchers to explore, innovate, and solve real-world problems using wireless sensor networks in a hands-on, scalable, and customizable environment.
Live Dataset & Backend Visualization
Our WSN Kit not only collects real-time sensor data, but also stores it in a structured backend database. This enables users to monitor, analyze, and export sensor readings for further research or reporting.
Below are sample screenshots from our backend (phpMyAdmin) showing:
- The list of registered nodes repeaters and sensors
- Repeater 1
- Repeater 2
- LDR sensor
- Temperature sensor
- Gas sensor
- Push button/Trigger sensor
- Humidity sensor
- The live stream of sensor data as it is recorded in the database, including timestamps and sensor values.
These visuals help students and researchers understand how sensor data is stored, managed, and can be accessed for further analysis or visualization.
-
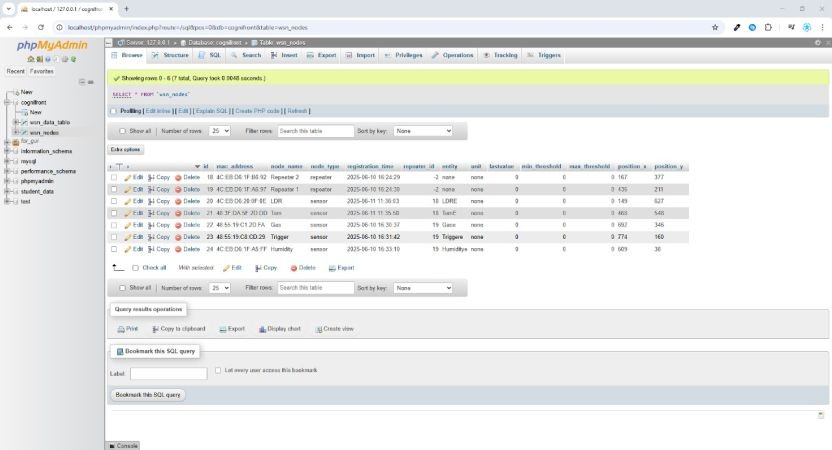 Node Registration Table
Inside view of the backend table displaying all registered sensor and repeater nodes, including MAC address, node type, and assignment. -
 Live Sensor Data Table
Inside view of the data table showing real-time sensor readings, values, and timestamps as collected from the deployed nodes.


You can use this backend to:
- Track which sensors are active and their current configuration.
- Analyze historical data trends for each sensor type (temperature, humidity, gas, etc.).
- Export the dataset for use in spreadsheets, reports, or further data visualization tools.
This transparent view of the backend empowers students to learn about data management, database structure, and the importance of reliable data storage in IoT projects.
Frequently Asked Questions
Why isn't sensor data visible on the GUI?
- Ensure all nodes have power (check LED indicators).
- Verify WiFi connectivity between nodes and the server.
- Confirm the Desktop GUI is running and set to "Live Mode".
- Check if sensor-repeater-server connections follow the hierarchical architecture.
How do I troubleshoot unstable connections?
- Reduce physical distance between nodes (ideal range: 10–30 meters).
- Avoid placing nodes near microwave ovens or metal surfaces.
- Restart the Server Node and Repeaters to reset the network.
Are the sensors pre-calibrated?
- Yes, all sensors are factory-calibrated. For advanced projects:
- Temperature: Recalibrate using ice-water (0°C) and boiling water (100°C).
- Humidity: Use a calibrated hygrometer for reference.
Can I power the nodes with batteries?
- Yes! Use 2xAA batteries (3.7V) for Sensor/Repeater Nodes.
- For prolonged use, connect a 5V/1A power bank to the Server Node.
Have you deployed this kit in real industries?
- Yes! Example: CEAT Tyres Manufacturing Plant
- Problem: Monitoring temperature and humidity in vulcanization chambers.
- Solution: Deployed 21 sensors (temperature/humidity etc) and 42 total nodes were used.
- Result: 15% energy savings via optimized HVAC control.
How many sensors can I add to the network?
- Theoretically unlimited! Practical limits depend on:
- WiFi bandwidth (recommended: ≤50 nodes per server).
- Power availability (use solar panels for large deployments).
Is the data encrypted during transmission?
- Yes! HTTP protocol is used from the repeater to the server.
- ESP-NOW protocol is used from the sensors to the repeaters.
Notes
- Make sure each sensor is uniquely addressed.
- Only one repeater should handle a sensor's data.